
Every stencil artist remembers their first disaster. You spent three hours cutting a design into cereal box cardboard, taped it to a wall, hit it with Krylon, and watched the whole thing warp into a soggy mess. The paint bled under every bridge. The fine details ripped out. You peeled it off the wall and threw it in the trash.
That's not a failure of skill. That's a failure of materials. The stuff you cut on matters just as much as the design itself, and most beginners learn this the hard way. This is the guide that saves you the trouble.

Mylar: The Gold Standard
If you're serious about stenciling, mylar is where you end up. It's a polyester film, usually 4 to 10 mil thick, and it handles everything you throw at it. Spray paint, acrylic, ink, whatever. It doesn't warp. It doesn't absorb moisture. You can clean it off and reuse it dozens of times.
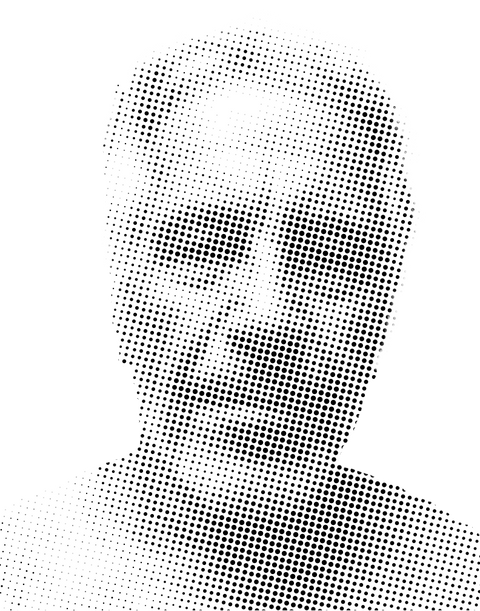
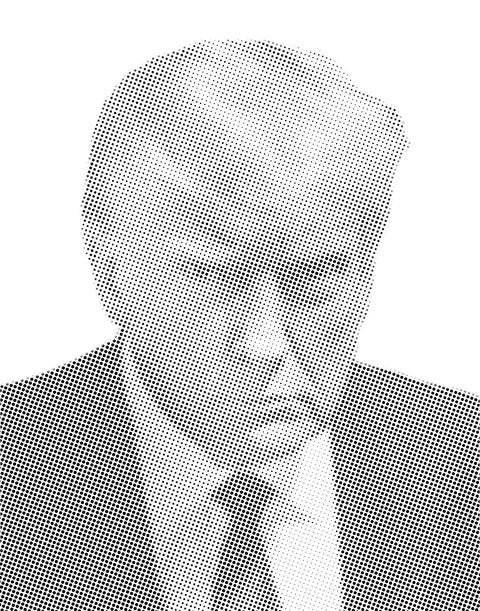
Mylar cuts clean with an X-Acto blade and even cleaner with a laser cutter. For multi-layer stencils with halftone patterns, it's basically the only serious option because it holds fine detail without tearing. If you've seen those dot-matrix portrait stencils that look almost photographic, those are cut on mylar.
The only downside is cost. Mylar sheets run more than cardboard or acetate, so you probably don't want to burn through them on practice runs. But for a finished piece you plan to use more than once, nothing else comes close.
Acetate, Cardboard, and the Budget Options
Acetate sheets (the same material as old overhead transparencies) are a solid budget pick. They're thinner than mylar and won't survive as many uses, but they're transparent, which makes alignment easy when you're cutting a traced design. Great for one-off stencils and testing compositions before committing to mylar.
Cardboard is the material everyone starts with, and honestly, it works fine for bold, simple shapes. Thick corrugated is too clunky, but cereal box weight or mat board can handle a single spray session. Just don't expect it to survive moisture or repeated use. One coat of spray adhesive on the back helps it lay flat against the surface and reduces bleed.
Freezer paper deserves a mention for anyone stenciling on fabric. You iron the waxy side directly onto a t-shirt or canvas, cut your design, and spray. The wax creates a temporary seal that prevents underspray. Peel it off and the edges are razor sharp. It's a one-time-use material, but for fabric work, nothing beats it.
Vinyl and Oiled Manila Board
If you own a Cricut or Silhouette cutting machine, adhesive vinyl opens up a whole different workflow. You design digitally, send it to the cutter, weed out the negative space, and apply the vinyl directly as a mask. The adhesive backing eliminates bleed almost entirely. It's precise, fast, and ideal for small-batch production work.
Oiled manila board (sometimes sold as "stencil board") is the old-school choice. It's a thick, oil-treated cardstock that resists moisture better than regular cardboard. Art supply stores have carried it for decades. It cuts easily, holds up for several uses, and costs almost nothing. The tradeoff is that it can't hold very fine detail, so it's better for lettering and bold graphic shapes than for photorealistic portrait work.

How to Cut Stencils: Hand-Cut vs. Laser-Cut vs. Vinyl Cutter
Hand-cutting is the most accessible method and the one most artists start with. All you need is an X-Acto knife with a #11 blade, a self-healing cutting mat, and patience. Swap blades often. A dull blade drags and tears instead of cutting, and that's where you lose fine details. Rotary cutters work well for long straight lines and gentle curves, but for intricate work, the X-Acto is king.
Laser cutting is a level up. If you have access to a laser cutter (makerspaces, fab labs, some print shops), you can cut designs with insane precision. Halftone stencils with hundreds of tiny dots that would take hours by hand get burned out in minutes. The catch is file prep: you need clean vector paths, and the learning curve on the software side is real.
That's where something like the Stencilizer plugin by Schwingo comes in handy. It's a Photoshop plugin that converts any photograph into a cut-ready stencil pattern, complete with halftone dots and proper bridge structure. If you want to go from photo to laser file without spending hours in Illustrator tracing paths, it does the heavy lifting for you.
Vinyl cutters (Cricut, Silhouette) split the difference between hand and laser. They can't match laser precision on very fine detail, but they handle medium-complexity designs well and they're affordable enough to own at home.
Bridges, Islands, and Registration Marks
Material choice only gets you halfway. If your design doesn't account for bridges, you'll cut out pieces that fall away and leave you with a useless sheet full of holes.
"Every closed shape in your stencil needs a bridge connecting it to the rest of the material. No bridge, no island. The letter O without bridges is just a hole. Plan your bridges before you start cutting, not after."
Islands are the floating pieces inside closed shapes. The center of an "O," the pupil inside an eye. Bridges hold them in place. When designing a stencil, you either build bridges into the artwork or you accept that those interior details will be lost. Good stencil design makes bridges look intentional, like part of the aesthetic rather than a structural compromise.
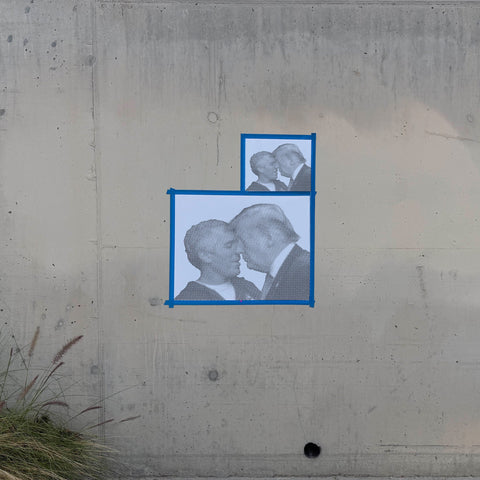
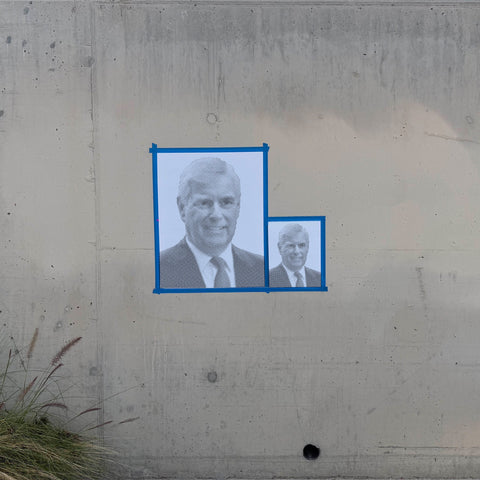
For multi-layer stencils, registration marks are critical. These are small alignment indicators (crosshairs, corner notches, or pin holes) cut into each layer so you can line them up precisely when spraying. Without them, your three-color portrait turns into a blurry mess. Cut registration marks into every layer, even if you think you can eyeball it. You can't.
Where to Find Stencil Designs Worth Cutting
If you'd rather skip the design phase and get straight to cutting, TasteBueno sells pre-designed halftone stencils that are ready to cut at home or already laser-cut on mylar. Their catalog leans heavily into political and pop culture portraiture, all done in Schwingo's signature dot-matrix style. It's a good shortcut if you want gallery-quality stencil work without building the design from scratch.
Whether you're cutting your first stencil out of a cereal box or laser-burning a four-layer halftone portrait on mylar, the fundamentals stay the same. Use the right material for the job. Keep your blades sharp. Plan your bridges before you cut. And if the paint bleeds, it's not your fault. It's the cardboard's.

0 comments